NumPy is the library that gives Python fast arrays of numbers. Pandas is built on top of it, so this is where data handling starts.
NPY.01 · NumPy
Introduction to NumPy
11-IP
NumPy (Numerical Python) is a library for working with arrays: grids of values that are all of the same type. Its array is called an ndarray (n-dimensional array). It is installed with pip install numpy and is almost always imported as np.
All elements have one data type, so NumPy stores them close together in memory and works on them very fast.
An operation on an array applies to every element at once. A list does not behave this way.
Python
import numpy as np
L = [10, 20, 30]
A = np.array(L)
print(L * 2)
print(A * 2)
print(type(A))
Pass a list to np.array(). A list of lists makes a 2-D array (rows and columns).
Python
import numpy as np
a = np.array([4, 7, 1, 9])
b = np.array([[1, 2, 3], [4, 5, 6]])
print(a)
print(b)
print(b.shape, b.ndim, b.size, b.dtype)
Output
[4 7 1 9]
[[1 2 3]
[4 5 6]]
(2, 3) 2 6 int64
Attribute
Gives
For b
shape
(rows, columns)
(2, 3)
ndim
Number of dimensions
2
size
Total number of elements
6
dtype
Type of the elements
int64 (int32 on some Windows computers)
If the list mixes types, NumPy converts everything to one type that can hold them all: integers with a float become floats, and anything with a string becomes strings.
Python
import numpy as np
print(np.array([1, 2.5, 3]))
print(np.array([1, 'two', 3]))
Output
[1. 2.5 3. ]
['1' 'two' '3']
Common mistake
NumPy prints arrays with spaces, not commas: [20 40 60], not [20, 40, 60]. Write it that way in "write the output" answers.
Chapter practice · NPY
Check your understanding
What does np.array([1, 2, 3]) * 3 give?
Arithmetic on an array applies to every element.
For a = np.array([[1, 2], [3, 4], [5, 6]]), a.shape is:
3 rows and 2 columns.
np.array([2, 4.5]) stores its values as:
All elements share one type, so the integer becomes a float.
A library is a collection of ready-made code you import instead of writing it yourself. This unit uses two: Pandas for tables of data, and Matplotlib for charts.
LIB.01 · Introduction to Python Libraries
Pandas
12-IP
Pandas (from "panel data") is a library for storing, cleaning and analysing data in rows and columns, like a spreadsheet you control with code. Install it with pip install pandas and import it as pd.
A Series is one column: values with a label (index) for each. A DataFrame is a table: several columns that share one row index. Each column of a DataFrame is a Series.
Series
DataFrame
Dimensions
1-D (one column)
2-D (rows and columns)
Labels
Row index only
Row index and column names
Data types
One type for all values
Each column can have its own type
Mutability (CBSE terms)
Value mutable, size immutable
Value and size mutable
NumPy ndarray
Pandas DataFrame
Labels
Positions only (0, 1, 2 …)
Named rows and columns
Data types
One type for the whole array
A different type per column
Missing values
No special support
Shown and handled as NaN
LIB.02 · Introduction to Python Libraries
Matplotlib
12-IP
Matplotlib is a library for drawing charts and graphs. Its pyplot module has one simple function for each part of a chart. Install it with pip install matplotlib and import pyplot as plt:
Python
import matplotlib.pyplot as plt
Every chart follows three steps: prepare the data, plot it (plt.plot(), plt.bar(), plt.hist()), then show or save it (plt.show(), plt.savefig()). Chapter 5 covers each step.
Chapter practice · LIB
Check your understanding
Which statement imports pyplot in the usual way?
pyplot is a module inside the matplotlib library.
A Pandas structure with rows and columns, where each column may have a different type, is a:
A DataFrame is 2-D and allows a type per column.
In CBSE terms, a Series is:
Values can change; the number of elements is treated as fixed.
Your score
– / 3
Answer every question to see your score.
One-page revision
import pandas as pdtables of data
Series1-D, labelled; one type
DataFrame2-D; a type per column
import matplotlib.pyplot as pltcharts
Chapter 3 of 5 · SER
Series
How to create a Series, do arithmetic with it, and pick out exactly the values you want. Every output below is what Python actually prints.
SER.01 · Series
Creation of Series
12-IP
Use pd.Series(data, index=…). If you give no index, Pandas numbers the values 0, 1, 2 …. The last line, dtype, tells you the type of the values.
Python
import pandas as pd
marks = pd.Series([85, 90, 75])
print(marks)
Output
0 85
1 90
2 75
dtype: int64
Python · own index
import pandas as pd
marks = pd.Series([85, 90, 75],
                  index=['Asha', 'Kabir', 'Meera'])
print(marks)
A single value is repeated once for every label, so the index is required.
Python
import pandas as pd
s = pd.Series(5, index=['a', 'b', 'c'])
print(s)
Output
a 5
b 5
c 5
dtype: int64
Series attributes
An attribute is a property of the Series that you read without brackets: s.size, not s.size(). The examples use a Series of six students' marks (the same one used in SER.04).
Attribute
Gives
For the marks Series
index
The labels
Index(['Asha', …, 'Tara'])
values
The data as a NumPy array
[45 78 62 91 55 83]
dtype
Type of the values
int64
shape
A tuple with the length
(6,)
size
Number of values, counting NaN
6
ndim
Number of dimensions: always 1
1
name
A name for the Series (shown under it)
None until you set it
index.name
A name for the index (shown above it)
None until you set it
empty
True if the Series has no values
False
hasnans
True if any value is NaN
False
Python
import pandas as pd
marks = [45, 78, 62, 91, 55, 83]
names = ['Asha', 'Kabir', 'Meera',
         'Ravi', 'Sana', 'Tara']
s = pd.Series(marks, index=names)

print(s.dtype)
print(s.shape)
print(s.size)
print(s.ndim)
print(s.empty)
print(s.hasnans)
Output
int64
(6,)
6
1
False
False
name and index.name can be set; they then appear when the Series is printed:
Student
Asha 45
Kabir 78
Meera 62
Ravi 91
Sana 55
Tara 83
Name: Marks, dtype: int64
size counts every value; the methodcount() counts only values that are not NaN. A Series with NaN becomes float, as here.
Python
import pandas as pd
r = pd.Series([4, None, 6])
print(r)
print(r.size, r.count(), r.hasnans)
Output
0 4.0
1 NaN
2 6.0
dtype: float64
3 2 True
Python · an empty Series
import pandas as pd
e = pd.Series(dtype='int64')
print(e.empty, e.size)
Output
True 0
Exam tip
shape of a Series is a tuple with one number and a comma, (6,). Writing 6 or (6) loses the mark.
SER.02 · Series
Mathematical Operations on Series
12-IP
+ - * / between two Series work label by label, not position by position. Pandas lines up matching index labels. A label found in only one Series gets NaN (Not a Number), meaning "missing".
Only b is in both, so only b gets a value. The result becomes float64, because NaN is a float. To treat missing values as 0, use the method form with fill_value. Arithmetic with a single number applies to every value.
For labels that are valid Python names, s.Meera also works, but the bracket form always works.
2 · Several values
Put a list inside the brackets, so there are two pairs: s[['Ravi', 'Asha']]. The result is a Series in the order you listed, and a label or position may repeat.
Ravi 91
Asha 45
dtype: int64
Asha 45
Ravi 91
Asha 45
dtype: int64
3 · Slicing by label: the end is included
s['Kabir':'Ravi'] or s.loc['Kabir':'Ravi'] gives everything from Kabir up to and including Ravi. Leave out the start or the end to go from the beginning or to the end.
Kabir 78
Meera 62
Ravi 91
dtype: int64
Asha 45
Kabir 78
dtype: int64
Sana 55
Tara 83
dtype: int64
5 · Steps and reversing
A third number is the step: [::2] takes every second value and [::-1] reverses. A label slice in the wrong order ('Ravi':'Kabir') gives an empty Series, not an error.
Older papers write s[0] on a Series with name labels to mean "the first value". It still works in Pandas 2 but warns that it is being removed. Write s.iloc[0] in your answers.
Chapter practice · SER
Check your understanding
Predict the output
import pandas as pd
print(pd.Series(5, index=[0, 1, 2]))
0 5
1 5
2 5
dtype: int64
A scalar is repeated for each label.
import pandas as pd
s = pd.Series([11, 22, 33, 44],
              index=['a', 'b', 'c', 'd'])
print(s[s % 2 != 0])
a 11
c 33
dtype: int64
The condition keeps only odd values, with their labels.
import pandas as pd
s = pd.Series([5, 10, 15, 20, 25])
print(s[1:3])
print(s.loc[1:3])
A CSV (comma-separated values) file is plain text: one row per line, values separated by commas, with column names on the first line. pd.read_csv() turns it into a DataFrame.
To add a column, assign to a column name that doesn't exist yet: df['New'] = …. What you put on the right decides what goes in each row. All these start from marks.csv.
1 · A list of values
One value per row, in row order. The list must have exactly as many values as there are rows.
A Series is matched to the rows by index label, not by position. A row whose label isn't in the Series gets NaN (and the column becomes float); labels in the Series that aren't rows are ignored.
RollNo Name Maths Science Bonus
0 101 Asha 88 92 5.0
1 102 Kabir 74 81 NaN
2 103 Meera 91 85 3.0
3 104 Ravi 66 70 4.0
Row 1 (Kabir) has no bonus because label 1 isn't in bonus.
5 · At a chosen position: insert()
df['New'] = … always adds at the end. df.insert(position, name, values) puts the column where you want it and changes df directly. Using a name that already exists gives ValueError: cannot insert …, already exists.
One column in single brackets gives a Series; a list of columns in double brackets gives a DataFrame. Selecting rows, single values and rows by a condition is covered in full in DF.05 Indexing.
Python
import pandas as pd
df = pd.read_csv('marks.csv')
print(df['Name'])
print(df[['Name', 'Maths']])
Output
0 Asha
1 Kabir
2 Meera
3 Ravi
Name: Name, dtype: object
Name Maths
0 Asha 88
1 Kabir 74
2 Meera 91
3 Ravi 66
Pandas has three ways to delete: drop() for rows and columns (one or many), del for one column, and pop() for one column that you also want to keep. Most examples start from marks.csv.
axis=0 (the default) means rows, named by the index. axis=1 means columns. Forgetting axis=1 makes Pandas look for a row with that name.
1 · drop() a column
Give the column name and axis=1. drop()returns a new DataFrame and leaves the original unchanged: the last line shows that df still has Science.
Python
import pandas as pd
df = pd.read_csv('marks.csv')

new = df.drop('Science', axis=1)
print(new)
print(df.columns)
Index(['Asha', 'Meera'], dtype='object')
Maths Science City
Kabir 74 81 Delhi
Ravi 66 70 Agra
6 · drop() rows that meet a condition
Find the labels of the matching rows with a boolean selection and .index, then drop them. Keeping the other rows, df = df[df['Maths'] >= 75], gives the same result.
import pandas as pd
df = pd.read_csv('marks.csv')

print(df.drop(index=[0, 3], columns=['RollNo']))
Output
Name Maths Science
1 Kabir 74 81
2 Meera 91 85
8 · Making the change stick: inplace=True or assign back
Either write df = df.drop(…), or write df.drop(…, inplace=True), which changes df itself and returns None. Never combine them: df = df.drop(…, inplace=True) sets df to None.
Python
import pandas as pd
df = pd.read_csv('marks.csv')

df.drop('RollNo', axis=1, inplace=True)
print(df)
result = df.drop(0, inplace=True)
print(result)
Output
Name Maths Science
0 Asha 88 92
1 Kabir 74 81
2 Meera 91 85
3 Ravi 66 70
None
9 · Renumbering after deleting rows
Deleting rows leaves gaps in the labels. reset_index(drop=True) numbers the rows 0, 1, 2 … again. drop=True stops the old labels from being kept as a new column.
RollNo Name Maths Science
1 102 Kabir 74 81
3 104 Ravi 66 70
RollNo Name Maths Science
0 102 Kabir 74 81
1 104 Ravi 66 70
10 · del: one column, permanently
del df['Science'] removes the column from df at once. There is no inplace, nothing is returned, and it works on one column only. It cannot delete rows.
Python
import pandas as pd
df = pd.read_csv('marks.csv')

del df['Science']
print(df)
Output
RollNo Name Maths
0 101 Asha 88
1 102 Kabir 74
2 103 Meera 91
3 104 Ravi 66
11 · pop(): remove a column and keep it
df.pop('Maths') removes the column from dfand returns it as a Series, so you can still use it. Like del, it takes one column only.
Python
import pandas as pd
df = pd.read_csv('marks.csv')

m = df.pop('Maths')
print(m)
print(df)
The last n rows; 5 if you give no number. If the table has fewer rows than n, you simply get all of them.
Python
import pandas as pd
df = pd.read_csv('marks.csv')
print(df.head(2))
print(df.tail(1))
Output
RollNo Name Maths Science
0 101 Asha 88 92
1 102 Kabir 74 81
RollNo Name Maths Science
3 104 Ravi 66 70
DF.05 · Data Frames
Indexing
12-IP
Selecting rows, columns and single values is asked in almost every paper. All the examples below use this table, which has name labels, so you can see clearly when a label is used and when a position is.
Rows and columns both have a label and a position. Inside loc[…] and iloc[…], the part before the comma picks rows and the part after it picks columns.
1 · Columns: df['…']
Plain square brackets with a column name give that column as a Series. A list of names gives a DataFrame with those columns, in your order. df.Maths also works for simple names.
Python
print(df['Maths'])
print(df[['City', 'Maths']])
Output
Asha 88
Kabir 74
Meera 91
Ravi 66
Name: Maths, dtype: int64
City Maths
Asha Delhi 88
Kabir Delhi 74
Meera Pune 91
Ravi Agra 66
2 · Rows by label: df.loc[…]
One label gives that row as a Series, whose index is the column names and whose Name is the row label. A list of labels gives a DataFrame.
Maths 74
Science 81
City Delhi
Name: Kabir, dtype: object
Maths Science City
Asha 88 92 Delhi
Ravi 66 70 Agra
3 · Rows by position: df.iloc[…]
The same, but with positions 0, 1, 2 …; df.iloc[-1] is the last row.
Python
print(df.iloc[0])
print(df.iloc[[0, 2]])
Output
Maths 88
Science 92
City Delhi
Name: Asha, dtype: object
Maths Science City
Asha 88 92 Delhi
Meera 91 85 Pune
4 · A range of rows: three ways
These three give the same rows here, but read the slice ends: locincludes 'Meera', while iloc[1:3] and df[1:3]stop before position 3. A slice in plain brackets picks rows, even though a name in plain brackets picks a column.
A condition on a column, such as df['Maths'] > 80, gives True/False for every row. Put it inside df[…] to keep only the rows where it is True. This works for text columns too.
Asha True
Kabir False
Meera True
Ravi False
Name: Maths, dtype: bool
Maths Science City
Asha 88 92 Delhi
Meera 91 85 Pune
Maths Science City
Asha 88 92 Delhi
Kabir 74 81 Delhi
Join conditions with &, | and ~, each in its own brackets. Use loc to filter rows and pick columns at the same time. isin() checks for several values at once.
Maths Science City
Asha 88 92 Delhi
Kabir 74 85 Delhi
Meera 91 85 Pune
Ravi 70 85 Agra
Summary
You write
Picks
You get
df['Maths']
one column
Series
df[['City', 'Maths']]
several columns
DataFrame
df.loc['Kabir'] / df.iloc[1]
one row
Series
df.loc['Kabir':'Meera']
rows by label, end included
DataFrame
df.iloc[1:3], df[1:3]
rows by position, end left out
DataFrame
df.loc['Meera', 'Maths'] / df.iloc[2, 0]
one cell
single value
df.loc[:, 'Maths'] / df.iloc[:, 0]
one whole column
Series
df[df['Maths'] > 80]
rows meeting a condition
DataFrame
Mistake
What happens
df['Kabir'] (a row label in plain brackets)
KeyError: plain brackets look for a column. Use df.loc['Kabir']
df['City', 'Maths']
KeyError: use a list, df[['City', 'Maths']]
df.loc[1] on this table
KeyError: 1 is not a label here. Use df.iloc[1]
df.iloc['Kabir']
TypeError: iloc takes positions only
Exam tip
"Which selects the first 4 rows when the index is 0, 1, 2 …?" → df.loc[0:3], df.iloc[0:4] or df.head(4). df.loc[0:4] gives 5 rows, because loc includes the end.
drop(columns=[…]) / drop(index=[…])several at once
df.drop(df.index[[0, 2]])rows by position
df.drop(df[cond].index)rows by condition
del df['c']one column; changes df; no return
df.pop('c')one column; returns it
reset_index(drop=True)renumber after deleting
inplace=Truechange df itself
rename(columns={…})old: new
loc / iloclabels, end in / positions, end out
df[df['x'] > 5]boolean indexing
df['col'] / df[['a','b']]Series / DataFrame
df.loc[row, col]one cell; rows first
df.loc[:, 'col']all rows, one column
df[1:3]rows by position, not columns
to_csv(…, index=False)DataFrame → file
Chapter 5 of 5 · VIS
Data Visualization
Turning numbers into pictures with Matplotlib's pyplot. Every chart below was drawn by running the code beside it.
VIS.01 · Data Visualization
Purpose of Plotting
12-IP
Data visualization means showing data as charts and graphs. A table of hundreds of numbers is hard to read; a chart shows the pattern at a glance.
See trends: are sales rising or falling over the months?
Compare: which subject has the highest average marks?
See distribution: how many students scored in each range?
Spot unusual values and explain results to others quickly.
VIS.02 · Data Visualization
Types of Plots
12-IP
The syllabus has three kinds of chart: the line plot, the bar graph (vertical or horizontal) and the histogram. Every chart below was drawn by running the code beside it.
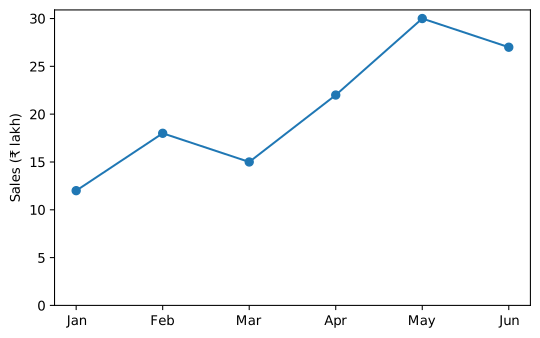
Joins points with lines to show a trend over an ordered sequence, usually time. plt.plot(x, y): x and y must have the same length, or you get a ValueError. With only one list, plt.plot(y), the x values are 0, 1, 2 …
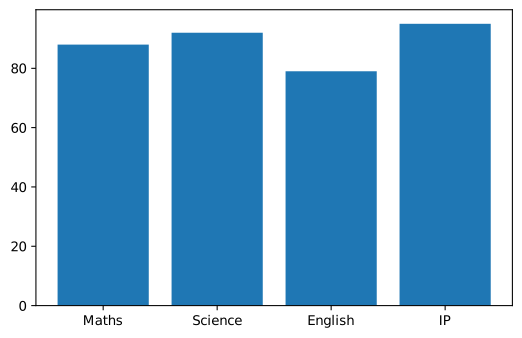
Rectangles whose lengths compare separate categories, such as subjects, houses or cities. plt.bar(x, height) draws vertical bars: the first list gives the categories, the second gives the bar heights.
Python
import matplotlib.pyplot as plt
subjects = ['Maths', 'Science', 'English', 'IP']
marks = [88, 92, 79, 95]
plt.bar(subjects, marks)
plt.show()
Figure 1
Width, colours and edges
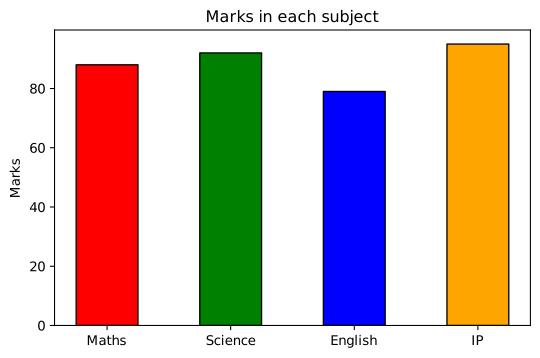
width sets how wide each bar is (default 0.8; 1 makes bars touch). color can be one colour for all bars or a list with one colour per bar. edgecolor draws an outline.
Python
import matplotlib.pyplot as plt
subjects = ['Maths', 'Science', 'English', 'IP']
marks = [88, 92, 79, 95]
plt.bar(subjects, marks, width=0.5,
        color=['red', 'green', 'blue', 'orange'],
        edgecolor='black')
plt.ylabel('Marks')
plt.title('Marks in each subject')
plt.show()
Figure 1
Horizontal bars: plt.barh()
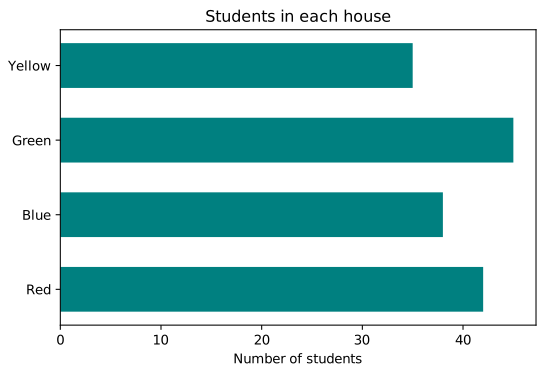
plt.barh(y, width) draws the bars sideways. Categories go on the y-axis and lengths along the x-axis, so the axis labels swap: here the numbers need xlabel. Use it when category names are long or there are many of them.
Python
import matplotlib.pyplot as plt
houses = ['Red', 'Blue', 'Green', 'Yellow']
students = [42, 38, 45, 35]
plt.barh(houses, students, height=0.6,
         color='teal')
plt.xlabel('Number of students')
plt.title('Students in each house')
plt.show()
Figure 1
Common mistake
In barh() the words swap meaning: the second argument is the bar's length (its parameter is called width), and height= is the bar's thickness (default 0.8). In bar(), width= is the thickness.
Two sets of bars side by side
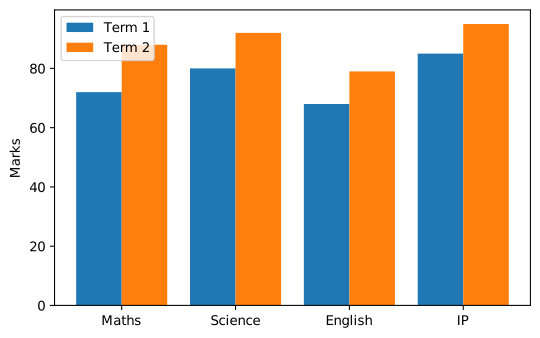
To compare two terms for each subject, draw two bar() calls at slightly shifted positions. np.arange() gives the positions 0, 1, 2, 3; each set is moved 0.2 left or right and made 0.4 wide, so the pairs sit together. plt.xticks() then puts the subject names back under each pair.
Shows the distribution of numeric data. It splits the range into intervals called bins, counts how many values fall in each, and draws one bar per bin. The bars touch, because the bins are continuous. You give it the raw values, and it does the counting.
bins as a number
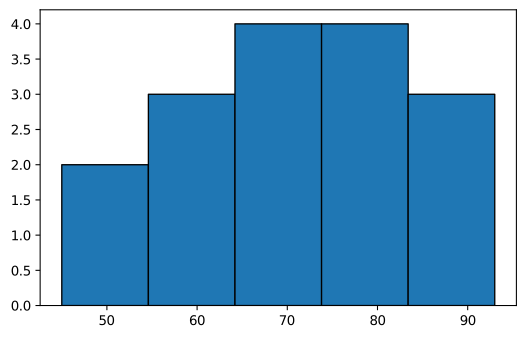
bins=5 cuts the range from the smallest to the largest value into 5 equal bins. Here 45 to 93 gives bins 9.6 wide, holding 2, 3, 4, 4 and 3 scores. The default is 10 bins.
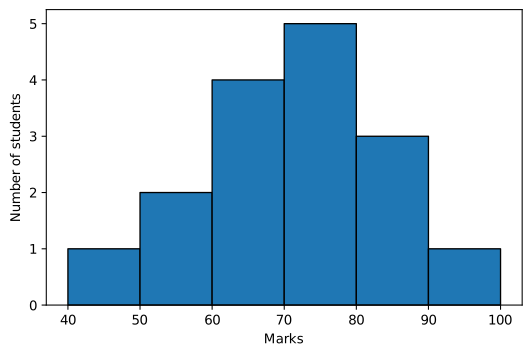
A list gives the edges of the bins yourself, so they are round numbers like 40–50, 50–60 …. Each bin includes its left edge but not its right, except the last, which includes both. So 50 counts in 50–60, and 100 counts in 90–100. The counts here are 1, 2, 4, 5, 3 and 1.
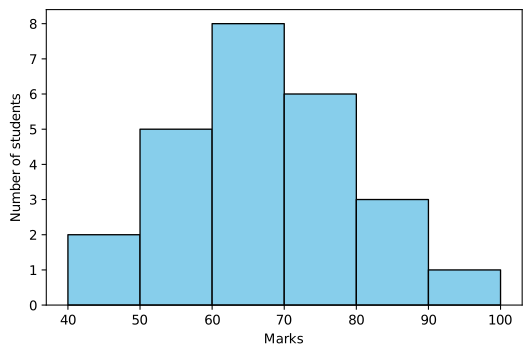
Often you get a frequency table instead of raw marks: "2 students scored 40–50, 5 scored 50–60 …". Give one value from inside each range (here its middle) and pass the counts as weights. Each value is then counted as many times as its weight instead of once, so the bar heights are exactly the counts.
Marks
40–50
50–60
60–70
70–80
80–90
90–100
Students
2
5
8
6
3
1
Python
import matplotlib.pyplot as plt
marks = [45, 55, 65, 75, 85, 95]    # middle of each range
students = [2, 5, 8, 6, 3, 1]       # how many in each
plt.hist(marks, bins=[40, 50, 60, 70, 80, 90, 100],
         weights=students, edgecolor='black',
         color='skyblue')
plt.xlabel('Marks')
plt.ylabel('Number of students')
plt.show()
Figure 1
Without weights, each of the six marks would be counted once, giving six bars of height 1. weights must be the same length as the data.
Outline and running-total histograms
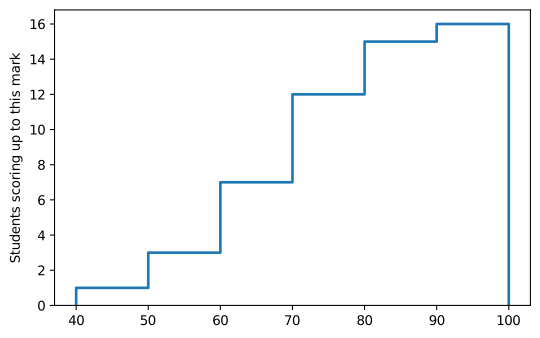
histtype='step' draws only the outline. cumulative=True makes each bar include all the bins before it, so the last bar equals the total number of values: here 1, 3, 7, 12, 15, 16.
Python
import matplotlib.pyplot as plt
scores = [45, 52, 58, 61, 63, 67, 68, 70,
          72, 74, 75, 78, 81, 84, 88, 93]
plt.hist(scores, bins=[40, 50, 60, 70, 80, 90, 100],
         histtype='step', cumulative=True,
         linewidth=2)
plt.ylabel('Students scoring up to this mark')
plt.show()
Figure 1
Parameter of plt.hist()
Meaning
Example
x (first argument)
The values to count
scores
bins
A number of equal bins, or a list of edges
bins=5, bins=[0, 25, 50, 75, 100]
weights
How many times to count each value
weights=[2, 5, 8]
range
Lowest and highest value to include
range=(40, 100)
histtype
'bar' (default), 'step' (outline), 'stepfilled'
histtype='step'
orientation
'vertical' (default) or 'horizontal'
orientation='horizontal'
cumulative
Each bar adds all earlier bins
cumulative=True
color, edgecolor
Fill and outline colour
edgecolor='black'
Line plot
Bar graph
Horizontal bar
Histogram
Shows
Trend over time
Comparison of categories
Comparison, long names
Distribution of values
You give it
x and y values
Categories and heights
Categories and lengths
Raw values (and bins)
Function
plt.plot()
plt.bar()
plt.barh()
plt.hist()
Common mistake
A bar graph and a histogram look alike, but a bar graph compares categories you name (gaps between bars, you give the heights), while a histogram counts how many values fall in each range (bars touch, it works out the heights).
VIS.03 · Data Visualization
Saving Plots
12-IP
plt.savefig('filename') saves the chart as an image file. The extension chooses the format: .png, .jpg, .pdf or .svg.
Python
import matplotlib.pyplot as plt
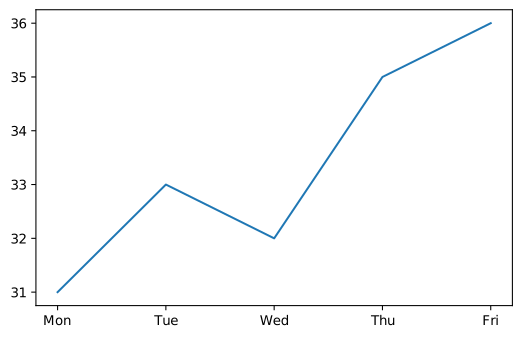
days = ['Mon', 'Tue', 'Wed', 'Thu', 'Fri']
temp = [31, 33, 32, 35, 36]
plt.plot(days, temp)
plt.savefig('temperature.png')    # save first
plt.show()                        # then show
Order matters
Call savefig()beforeshow(). Closing the chart window clears the figure, so saving afterwards gives a blank image.
VIS.04 · Data Visualization
Customizing Plots
12-IP
A chart should say what it shows. Add these after plotting and before show().
plt.legend() shows a key matching each line to its label. Without labels, the legend is empty.
Ticks: xticks() and yticks()
Ticks are the small marks along an axis and the numbers or names written at them. Matplotlib chooses them for you. plt.xticks() and plt.yticks() let you choose where they go and what they say.
plt.xticks(positions, labels) puts each label at a position. This plots months as 1 to 6, then shows month names there, and makes the y-axis go up in fives with range():
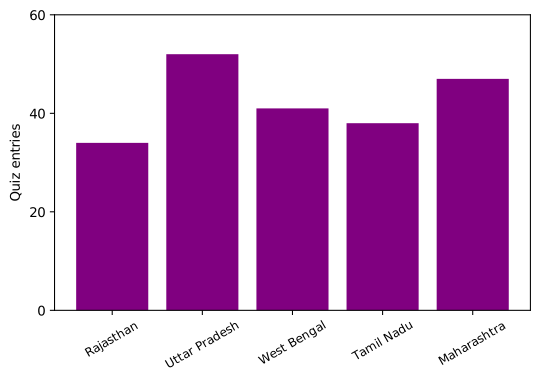
Long category names overlap. rotation tilts the labels and fontsize makes them smaller. Giving only positions, like yticks([0, 20, 40, 60]), keeps the numbers as labels.
Ticks only at 1, 2, 3, labelled with those numbers
plt.xticks([1, 2, 3], ['A', 'B', 'C'])
Ticks at 1, 2, 3, labelled A, B, C. The two lists must be the same length
plt.yticks(range(0, 101, 10))
y ticks every 10 from 0 to 100
plt.xticks(rotation=45)
Keep the ticks, tilt the labels 45°
plt.xticks(fontsize=8)
Smaller tick labels
plt.xticks([])
Hide the x ticks altogether
plt.xlim(0, 10) / plt.ylim(0, 100)
Related: set where the axis starts and ends
Exam tip
xticks() changes the marks and labels along the axis; xlabel() is the one name of the whole axis. A question asking to "display month names on the x-axis" wants xticks().
Argument
Changes
Example values
color
Line or bar colour
'red', 'g', 'blue', 'orange'
linestyle
Line pattern
'-' solid, '--' dashed, ':' dotted, '-.' dash-dot
linewidth
Line thickness
1, 2.5, 4
marker
Symbol at each point
'o' circle, 's' square, '^' triangle, '*' star
width / height (bars)
Bar thickness in bar() / barh()
0.4, 0.8
edgecolor
Outline of bars
'black'
bins, weights (hist)
Intervals; how often each value counts
5 or [0, 50, 100]; [2, 5, 8]
Chapter practice · VIS
Check your understanding
Which plot?
Show how a shop's sales changed month by month over a year.
Line plot.A trend over time.
Compare the number of students in each house: Red, Blue, Green, Yellow.
Bar graph.Separate categories compared.
Show how many students scored 0–20, 21–40, 41–60 and so on in an exam.
Histogram.The distribution of a numeric value in ranges.
Compare the number of entries from 12 states with long names such as "Arunachal Pradesh".
Horizontal bar graph (barh).Long names fit along the y-axis without overlapping.
You are given only a table: "40–50: 2 students, 50–60: 5 students …" and must draw its histogram.
Histogram with weights.One value per range, with the counts as weights.
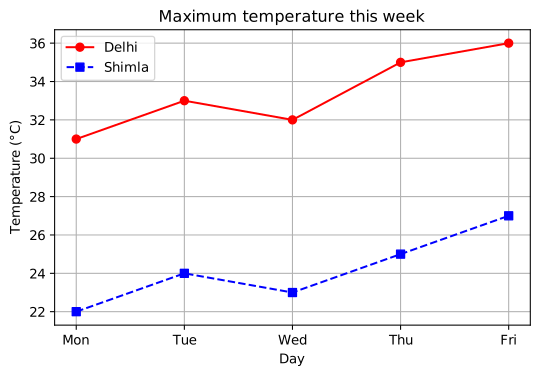
Compare the daily temperatures of two cities on one chart.
Line plot with two lines and a legend.Two trends, told apart by label and legend().
Self-check quiz
Which function sets the title of a graph?
title() adds the heading.
Which line style value draws a dashed line?
'--' is dashed; ':' is dotted.
Each line has a label= but no legend appears. What is missing?
Labels are only shown when legend() is called.
In plt.barh(names, values, height=0.5), height=0.5 sets:
In barh() the values give the length; height is the thickness.
Which shows the names Q1–Q4 at x positions 1–4?
Positions first, then the labels to show at them.
plt.hist([10, 30], bins=[0, 20, 40], weights=[4, 6]) draws bars of height:
Each value is counted as many times as its weight.
With bins=[0, 10, 20, 30], the value 20 falls in:
A bin includes its left edge but not its right (except the last bin).
The x-axis names overlap. Which tilts them?
Tick labels are changed with xticks().
In plt.hist(data, bins=10), bins=10 means:
Bins are the equal intervals the data is counted in.
Your score
– / 9
Answer every question to see your score.
One-page revision
plt.plot(x, y)line: trend
plt.bar(x, h)bars: compare categories
plt.barh(y, length)sideways bars; height= is thickness
width=0.8default bar thickness in bar()
color=[…]one colour per bar
x ± 0.2, width=0.4two sets of bars side by side
plt.hist(data, bins=n)distribution; n equal bins
bins=[40, 50, …]your own edges; left edge included
weights=[…]count each value that many times
histtype='step' · cumulativeoutline · running total
plt.xticks(pos, labels)choose tick positions and names